Saturday, November 23, 2013

Wild Persimmon Harvest

Facebook can be more than just a time-wasting social experience.  Last spring I learned about a Facebook group called Oklahoma Wildcrafting.  They are focused on edible wild plants and things that can be made from them.  It sounded interesting so I joined.  I've learned a great deal about wild plants from this group.  The group has over 800 members from all over the state.  The members appear to range all the way from novices, like me, to college professors.  You can bet that if you ask a question or post a picture of a flower or plant on their Facebook page, there will be someone who can answer the question or identify the plant.

A while back a fellow posted that he had a lot of wild persimmons on his farm and that anyone who would like to have some could contact him.  I messaged him, got directions and Tom and I took a road trip to gather persimmons.  Since neither of us has ever seen a persimmon tree, I wasn't sure what to look for.  But, the guy gave excellent directions and we found them easily.  The trees were small, but loaded with persimmons.  There were several trees.  Here is a picture of Tom picking fruit from the lower branches of one tree.


Here's a close-up picture showing the persimmons on the tree.


We gathered quite a few.  Here is about half of them in my kitchen sink after I washed them.


These are much smaller than the persimmons you may have seen in the grocery store.  Here's a picture of me holding one.


A friend gave me a recipe for persimmon cookies.  It calls for a cup of persimmon pulp.  Getting a cup of pulp turned out to be much more difficult than I expected because there are a lot of seeds inside each fruit.  The seeds are somewhat flatten and elongated and cling to the pulp inside.

First I removed the little "cap" from each fruit and then processed them in a food mill like this.  As you can see, it has a handle that is attached to a blade which is set at an angle.  As you turn the handle, whatever food is in the pan is forced under the open side of the blade and pushed against the bottom and through the small holes in the bottom.


On the underside, there is a wire that turns as the handle turns and scrapes the food off as it is forced through the holes.


I had to process the persimmons in small batches and it took a lot of elbow grease to turn the handle because of all the seeds.   Each small batch produced only a couple of tablespoons of pulp.   It was quite frustrating and I forgot to take pictures.  So, I don't  have any pictures to post of the process.  However, I processed enough of them to get the cup of pulp I needed for the cookies.

I think part of the problem may have been the persimmons were a little past their prime and were beginning to dry up so there was not as much juice in them, making it more difficult for them to go through the food mill.  Whatever the case, I would like to have some wild persimmon trees on our land, so I took the persimmons I had left and threw them in a hard to mow place where any seedlings that come up will not get cut down by the mower.

I'm not sure how successful I'm going to be in growing my own trees, though.  I think deer may have eaten the ones I threw out.   I walked by there a few days later and they appeared to be all gone.  

Sunday, November 17, 2013

Garden Cleanup

We had our first "killing" frost a couple of weeks ago and the garden is ready to be put to bed for the winter.  Tom has been working on the dead plant matter out in the field, while I've been working on the raised beds.  I try to do a little bit every time the weather is nice.

This weekend we had some beautiful fall days and I tackled the tomato vines.


These are the ones pictured from behind in the following post about the stripped tomatoes.

http://windyacresnaturalfarm.blogspot.com/2013/09/remember-stripped-tomatoes.html

First, I had to round up the appropriate gear and tools.


And, since I'm basically lazy, I had to have a stool to sit on.  This is my "rocker" stool.  It does not sink down into the dirt like a stool with legs would do and, since it "rocks", it also allows you to lean over to reach things easily.


Here's the pile of tomato vines I ended up with.


It is amazing how big some of the stalks were.  Here's an example.


The vines all went into the compost pile there by the bed.


The black plastic bags there contain leaves that Tom collected from a friends house.  These got put on top of the tomato vines.  


This is a concept that I learned about composting many years ago.  It is good to "layer" your compost ingredients.  I like to use fibrous material, like tomato vines, for at least one of the layers to introduce air into the compost.  This layer traps air pockets that contain oxygen, one of the essential ingredients to have aerobic decomposition take place.  

It is best if you can also "turn" your compost pile ever so often to mix everything up and introduce more air to help keep the aerobic process going.  I don't usually do that with this compost pile, since it gets mixed in with the BIG compost pile that Tom has going out in the field.  Here is a link to one of the posts I have written about that one.  It gets so hot from the decomposition process that it produces steam when turned in cold weather!

http://windyacresnaturalfarm.blogspot.com/2011/12/smoking-compost.html

Friday, November 8, 2013

Chicken Pics

It's been a while since I posted anything about our chickens.  So, thought I'd share a few comments and pictures of them.

Chickens are incredibly curious.  I was out in the pen, sitting on the ground, trying to get some good pictures of them.  (They don't hold still and pose very well.) This one came right up to the camera and I got a good shot of her looking straight into the lens.  Shortly after this, she gave the camera an inquisitive peck to check it out, but then decided it was not good to eat and went her way.
 

Below they are "helping" Tom work on the fence.  They come right up to him and peck the buttons on his shirt and anything else that looks interesting to them.  Tom has all of them named.


This chicken is a New Hampshire Red.  They are "kin" to Rhode Island Red chickens, but are bred to be a little meatier (in case you want to eat them).  We started out with 3 New Hampshire Red chickens, but a snake got one of them when they were little chicks and one of them died for no obvious reason.  We just found her dead in the pen one day.  This chicken is named Gertrude.


The chicken below is a hybrid.  I'm not sure what two breeds were bred to get this hybrid.  We purchased the chickens from our local Atwoods store in the spring of 2012.  They were just a couple of weeks old when we got them.   Atwoods sells baby chicks and ducks in the spring and fall each year.  We bought 3 of these hybrids and 3 of the New Hampshire Reds above.  We still have all 3 of the hybrids left.   Not sure if that means they have better luck than the New Hampshire Red chickens or what.


Here's another picture of Gertrude.  Chickens are constantly looking at the ground for bugs and other goodies.


Here they are taking dust baths.  This helps them rid themselves of mites and other pests.


Chickens have very good eyesight.  They can easily detect a grasshopper or caterpillar that is camouflaged in the grass.  I understand that scientists have come to the conclusion that birds descended from dinosaurs.  I can certainly believe that.  Just look at the chicken's eye below.  Doesn't that remind you or a T-Rex eye.....at least what Jurassic Park led us to believe a T-Rex eye looks like? 


It is difficult to capture a picture of a chicken scratching in the dirt.  Notice the chicken in the picture below has scratched out a hole.  She sort of does this little dance where she steps forward and scratches the dirt with both her feet, then steps back right quick and looks to see what has been uncovered.   It is amazing of how deep these holes can be.  Their pen looks like a war zone with huge bomb craters!


 And, finally here are 3 of them parading around the pen.   You can see my shadow where I am sitting trying to take their picture.  


Chickens are fascinating creatures.  I could sit for hours and watch them.  But, alas, I really need to get busy and get something useful accomplished today, so I'd better stop writing and get on with the day.

Saturday, November 2, 2013

Preserving Garden Goodness - Pickled Peppers

Another one of the things we harvested before the first frost of the season was jalapeno peppers.  Here are some of them.


Notice that some of them are red.  Most peppers turn red when they are ripe and, oddly enough, they are slightly sweeter when they are ripe and not as hot.

I was somewhat at a loss as to what to do with them.  Tom does not like peppers, especially hot peppers.   I searched the internet for ideas and found an easy recipe for pickled peppers.

Here are the ingredients needed.


3/4 cup distilled white vinegar
3/4 cup water
3 tablespoons sugar
1 tablespoon kosher salt
1 clove garlic minced
1/2 teaspoon dried oregano
2 cups sliced jalapeno peppers

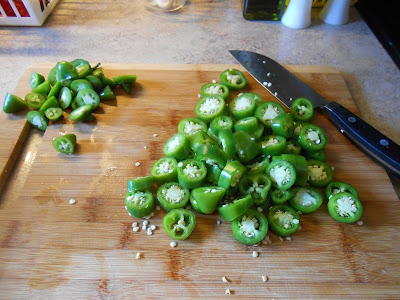
First, wash the peppers and slice them.


Next, combine vinegar, water, sugar, salt, garlic and oregano in a pan and bring to a boil.


Add the sliced peppers, remove from heat and let set for 10 minutes.


Pack the peppers into clean, sterilized half-pint (1 cup) canning jars.


Pour the water/vinegar solution over them to within half an inch of the jar rim.


Seal with clean sterilized lids.


Note that since these have not been canned in a water-bath canner, then you need to store them in the refrigerator.

I had a little bit of canning liquid left over that I put in a jar to use in salad dressings to give them a little "kick".