Wednesday, March 12, 2014

And We are Off and Running - 2014 Garden Underway

This winter has been abnormal for Oklahoma.  We've had wave after wave of freezing precipitation and really cold temperatures since the middle of December.  I'm sure folks up north are used to this, but here in Oklahoma we normally have a fairly mild winter with "maybe" a couple of waves of snow and ice.

Now it is the middle of March and I think we are finally beginning to see the light at the end of the tunnel.  There have recently been several days of warm weather and we have made good use of them to get ready for this year's garden season.  Tom has especially been busy.  He has set up t-posts and cattle panels that will be used to trellis our tomato plants this year.


We've tried several methods to keep our tomatoes up off the ground and finally settled on this method.  The t-posts and cattle panels are easy to set up and, once the panels are purchased, they can be used for many years.

Tom has also planted some of the onions we ordered.  This is just part of them.  He ran out of time before he got them all planted and has to wait until the weather warms up again.


We have been starting seeds in our basement.  The seeds start out in a row tray like this:


Then when they get big enough, we transplant them into pots, like this:


Eventually, we will run out of room in the basement and will have to move them to our small greenhouse.   

Picture of Green House

Finally, I'm in the process of creating a new raised bed.


I got started on this a couple of months ago when we happened to have a mild day between ice storms.  The bed currently has Fairy Roses in it.  These are somewhat of a domesticated wild rose, but still have plenty of thorns and a rather unruly growth habit.  I have cut the roses back and want to transplant them to another location.    It is a big job and I'm procrastinating getting back to it, but need to get it finished so we'll have more room for tomatoes, peppers, okra and such.

More to come .....

Wednesday, March 5, 2014

Rhoda's Yogurt Biscuits

Over the years, I've tried several biscuit recipes and, for many years, I used a buttermilk biscuit recipe that we liked quite well.  However, a couple of years ago a friend of mine gave me a recipe for biscuits that used yogurt instead of buttermilk.  Since I make my own yogurt, I always have several jars on hand.  So, I tried the recipe, was "hooked" and have used this recipe ever since.   Here it is.  I hope you can read my writing!


First, put the flour, baking powder and salt in a mixing bowl. 


Cut in the butter until it is the size of small peas.  Then add the yogurt, along with enough milk to make a stiff dough.  Turn the dough out on a floured work surface.


Knead a few strokes, just until you can smooth it into a ball.  If you knead it too much, the biscuits will be tough.  


Roll out the dough until it is about half an inch thick.


Cut it into biscuits.  The cutter I use is about 2.5 inches in diameter. For just the two of us, I only make half the recipe and get 6 biscuits.   I get 4 biscuits from the first cutting, gather the scraps together, roll them out and get 2 more.


Put the biscuits on a cookie sheet in a 400 degree oven and bake until golden brown.


Today, I served these with scrambled eggs to which I added crumbled bacon and cheddar cheese.


There is nothing better on a cold winter morning than hot biscuits with lots of butter and jelly! Yum!

Thursday, February 27, 2014

Water for Chickens

Keeping the water for our chickens from freezing is sometimes a problem in the winter.  However, we have a good solution that works quite well.  We borrowed this idea from a friend who has done something similar. (Must give credit where credit is due!)  Here's a picture of what we have done.


Inside the chicken coop, we made a stand out of cement blocks, leaving a space in the middle.  Inside the space, we set a single light bulb that can be plugged into a wall outlet.  Then, we set the water container over the light bulb, like this.


We only plug the cord in on very cold days (and nights).  The heat generated from the light bulb is just enough to keep the water from freezing.  There were a couple of times when there was a very thin layer of ice on the water, but it never froze completely and the girls were still able to get drinks, which they appreciated greatly.  


Saturday, February 22, 2014

Apple Gourds, Etc.

I've written several entries about the Birdhouse gourds that Tom grows.  Here is one I wrote in June of 2012.

http://windyacresnaturalfarm.blogspot.com/2012/06/gourds-running-rampant.html

However, we had record-breaking drought and heat that summer and by August those same vines looked dead.  Here's an entry I wrote at that time.

http://windyacresnaturalfarm.blogspot.com/2012/08/gourd-graveyard.html

But, gourds are amazingly resilient.  After the weather cooled and we got a little bit of rain, they made a miraculous recovery and began to grow again.

http://windyacresnaturalfarm.blogspot.com/2012/10/gourds-revived.html

I'm happy to report that we are still growing Birdhouse gourds and last year Tom added another variety of gourd called an Apple gourd.  Here's what they look like.


They are shaped like apples and are covered with beautiful patterns of light and dark green.  They vary in size, but are generally about 6 inches in diameter.  They will eventually dry and turn a light brown color.  Once dry, they can be painted.  Many people like to paint them red so they look like (would you believe) apples.  


Sunday, February 16, 2014

New Tea Ball and Chamomile Tea

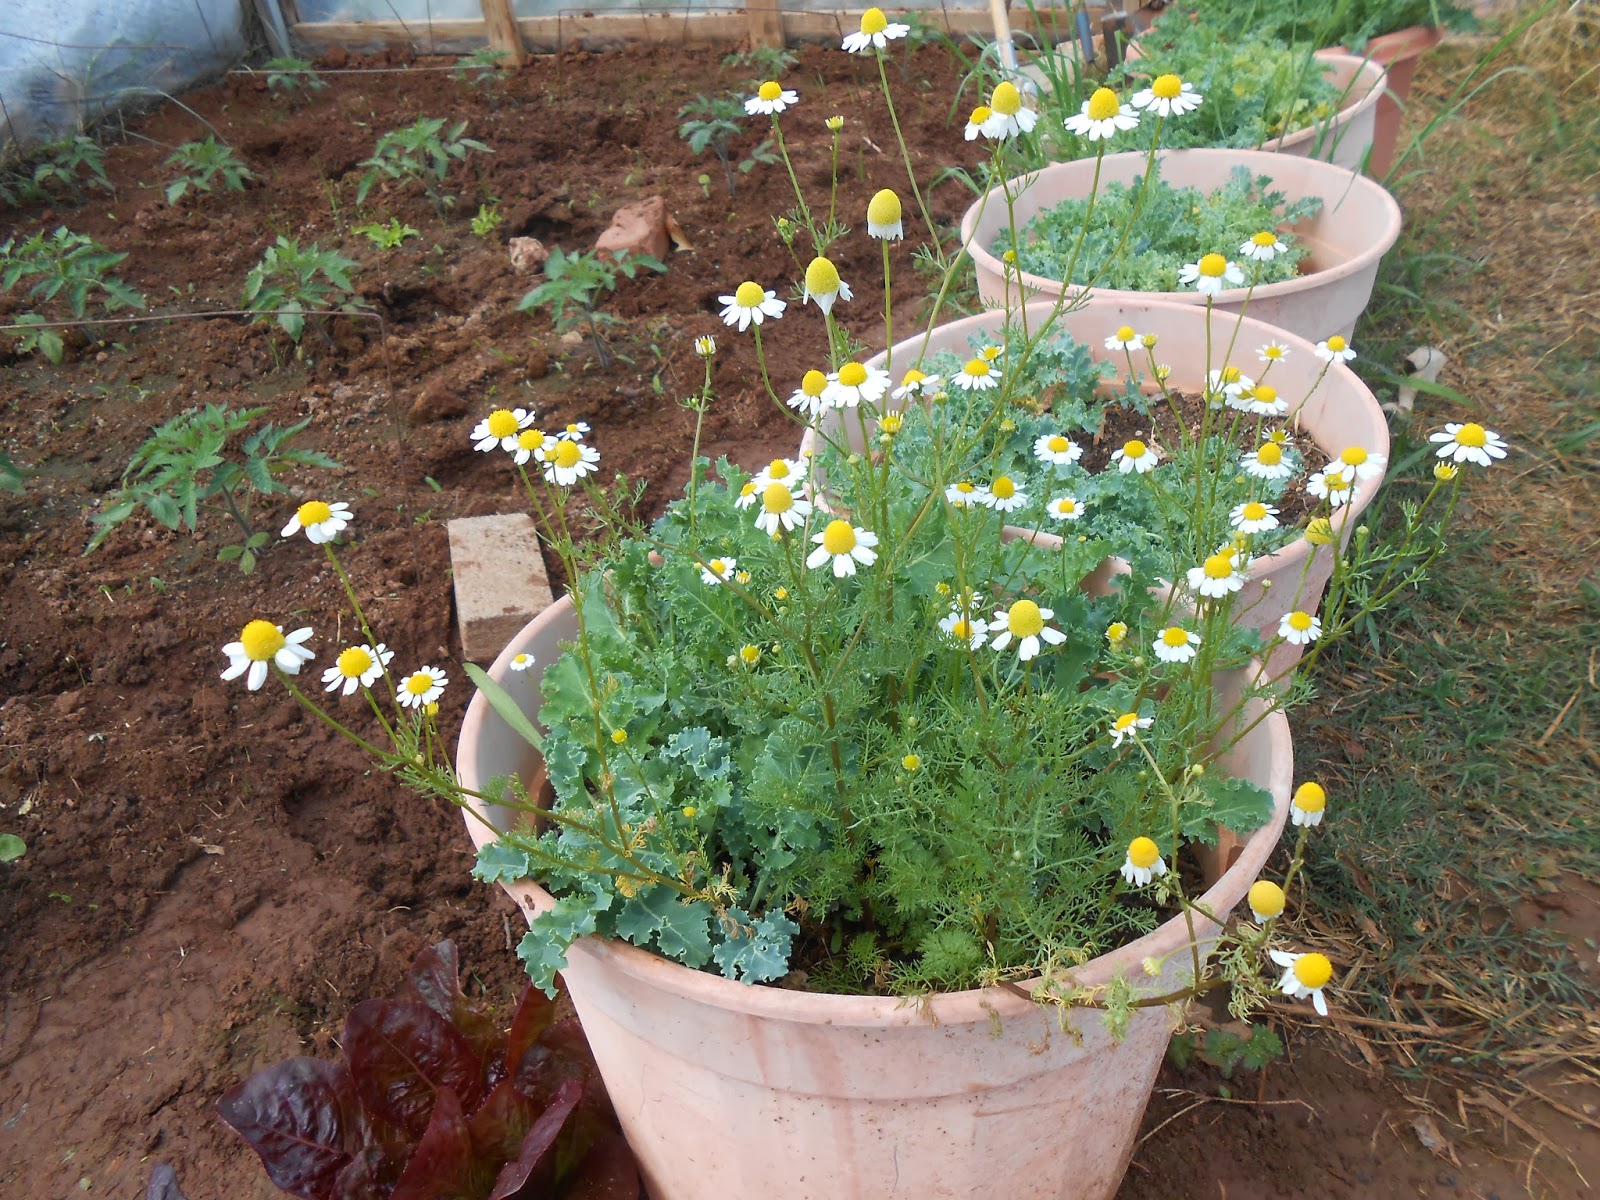
I've grown chamomile for several years, not because I planted it, but because it reseeds itself each year.  That is fine with me because I adore it.  Not only is it a pretty plant, but the flowers can be used to make a soothing tea.  

There are two varieties of chamomile, Roman and German.  Roman Chamomile is a low-growing perennial herb while German Chamomile is an annual.  Both of them contain Chamazulene which is an antioxidant that serves as a powerful anti-inflammatory agent.  No wonder chamomile has been used as an herbal medicine for thousands of years.

 My chamomile is the German variety.  The flowers look like this.


I wrote about using the fresh flowers to make tea in the following post.

http://windyacresnaturalfarm.blogspot.com/2011/05/chamomile-tea.html

This year, however, I made a point to save some of the flowers to dry so that I could have chamomile tea this winter.  The flowers are easy to dry.  I just laid them on a paper towel on the kitchen counter for several days.  Here's what they looked like after they dried.


I recently purchased a nice tea ball that I like a lot.  


The end turns and causes half of the ball to rotate so that it opens up like this.


I put about a tablespoon of the dried chamomile flowers inside, filled a cup with hot (almost boiling) water and lowered the tea ball in the cup.


After a few minutes, it looked like this.


When the desired strength is reached, I add a little honey to the cup.


There is nothing better than a nice soothing cup of chamomile tea at bedtime to help one sleep.

Tuesday, February 11, 2014

Bread for Chickens

Chickens will eat just about anything and I occasionally feed them stale bread and other kitchen left-overs.  In fact, they have got to where they will cluster against the side of their pen when they see me coming in anticipation of whatever succulent goody I might have for them.


Last summer, I caught grasshoppers and threw in the pen.  It was quite a circus to watch as they madly chased the grasshoppers.  However, during the winter, we have to forego the grasshoppers.  On this particular day last fall, I took them some stale bread.  Yum!  I have learned from experience to hold the plastic bag high out of their reach.  Otherwise, they grab hold of it with their beaks and tear holes in it before I can get the bread out.  They can be quite impatient.


If there isn't enough of a particular food item (like a grasshopper) to go around, then they will squabble and fuss over it, the others chasing after the one that has it.  So, I make sure to break the bread up into smaller pieces so there is enough for everyone to have a piece of their own.


Ahhhh.  Peace and happiness for all.

Saturday, February 8, 2014

Homemade Noodles

Now that I have retired and have more time, I'm reviving some of my cooking skills that I lost over the years after the kids left home.  So many times in the past few years, I have arrived home after a day at the office and wondered what on earth we were going to do for dinner.  Usually, it was something really simple, like baked potatoes with toppings or mac and cheese.  All too often we ended up going out to eat.  So, I'm trying to getting back in the groove of planning meals and cooking.  

My friend, Pat, is an excellent cook and makes homemade noodles for her family's gatherings.  So, I dug out her recipe and decided to give it a try.  There are only 4 ingredients:  2 eggs, 4 tablespoons milk, 1 teaspoon salt and about 2 cups flour.  

I am bad about not reading a recipe all the way through before I begin.  What I was supposed to do was to mix the salt, eggs and milk together and then add the flour a little at a time until it formed a stiff dough.  What I actually did was just dump everything in a bowl.   Fortunately, it turned out okay anyway.


Mix it all together until it forms a ball of dough.


It may be a little sticky, but you can add more flour as you work it.  Next turn the dough out onto a floured surface.


Knead it a few strokes, working in more flour as needed until you have a smooth ball.


Let the dough rest for 20 minutes.  Then, divide the ball into 2 pieces to make it easier to roll out.


Roll out the first piece.


When you have it rolled out, cut it into strips using a pizza cutter.  A sharp knife will do if you don't have a pizza cutter.


Put these on pieces of newspaper to dry or use a cooling rack and repeat with the second ball of dough.


Once the noodles are dry, they can be put in freezer bags and frozen for future use.  Or, cook them immediately.

The noodles should be cooked in chicken broth.  You can make your own broth by boiling a whole chicken in water to cover.  Cook until the meat falls off the bones.  This can be done while you are making the noodles.  

To cook the noodles, drop them in boiling chicken broth and cook about 15 - 20 minutes until tender.  Shred the chicken and add to the noodles.  Add salt and pepper to taste.  Reheat and serve.

Finally, be sure to check your clothing to make sure you don't have any stray flour that needs to be dusted off.